mirror of
https://codeberg.org/canoeboot/cbwww.git
synced 2025-07-03 03:57:22 +01:00
155 lines
6.2 KiB
Markdown
155 lines
6.2 KiB
Markdown
---
|
|
title: Install Canoeboot HP Compaq Elite 8300 USDT
|
|
x-toc-enable: true
|
|
...
|
|
|
|
**[PLEASE READ THESE INSTRUCTIONS BEFORE INSTALLING](ivy_has_common.md), OR
|
|
YOU MAY BRICK YOUR MACHINE!! - Please click the link and follow the instructions
|
|
there, before flashing. For posterity,
|
|
[here is the link again](ivy_has_common.md).**
|
|
|
|
<div class="specs">
|
|
<center>
|
|
<img tabindex=1 alt="HP Compaq Elite 8300 USDT" class="p" src="https://av.canoeboot.org/hp8300usdt/hp8300usdt.jpg" /><span class="f"><img src="https://av.canoeboot.org/hp8300usdt/hp8300usdt.jpg" /></span>
|
|
</center>
|
|
|
|
| ***Specifications*** | |
|
|
|---------------------------|---------------------------------------------|
|
|
| **Manufacturer** | HP |
|
|
| **Name** | Compaq 8300 Elite USDT |
|
|
| **Released** | 2012 |
|
|
| **Chipset** | Intel Q77 |
|
|
| **CPU** | Intel Sandy/Ivy Bridge (65W max.) |
|
|
| **Graphics** | Intel HD Graphics or MXM graphics card |
|
|
| **Memory** | Up to 16GB (2x8GB) |
|
|
| **Architecture** | x86_64 |
|
|
| **Intel ME/AMD PSP** | Present, neutered |
|
|
| **Flash chip** | SOIC-16 16MiB |
|
|
|
|
Open source BIOS/UEFI firmware
|
|
-------------------------
|
|
|
|
This document will teach you how to install Canoeboot, on your
|
|
HP Elite 8300 USDT desktop motherboard. Canoeboot replaces proprietary
|
|
BIOS/UEFI firmware.
|
|
|
|
This is a small but powerful desktop using Sandy or Ivy Bridge CPUs
|
|
(of up to 65W TDP).
|
|
It has a slot for a discrete MXM graphics card as well.
|
|
Some cards work while others don't. Your mileage will vary.
|
|
|
|
Canoeboot has support for this, in the Git repository and
|
|
release versions after (but not including) 20230423.
|
|
|
|
These features are tested and confirmed working:
|
|
|
|
* Native raminit with both DIMMs (up to 2x8GB)
|
|
* Libgfxinit textmode and framebuffer on both DisplayPorts and VGA
|
|
* SeaBIOS and GRUB payloads
|
|
* External USB2 and USB3 ports: they all work
|
|
* USB 3.0 SuperSpeed on Linux-libre (rear, 4 ports)
|
|
* Ethernet
|
|
* Mini-PCIe WLAN
|
|
* SATA: 2.5" disk (6Gbps), mSATA (3Gbps), and optical drive bay
|
|
* PS/2 keyboard and mouse
|
|
* S3 suspend and resume, wake using USB keyboard
|
|
* Headphone output, line out, internal speaker
|
|
* Wake on LAN
|
|
* Rebooting
|
|
|
|
Disable security before flashing
|
|
--------------------------------
|
|
|
|
Before internal flashing, you must first disable `/dev/mem` protections. Make
|
|
sure to re-enable them after you're finished.
|
|
|
|
See: [Disabling /dev/mem protection](../install/devmem.md)
|
|
|
|
Install Canoeboot
|
|
-----------------
|
|
|
|
These next sections will teach you how to install Canoeboot on your
|
|
HP Elite 8300 USDT motherboard.
|
|
|
|
### Internal flashing
|
|
|
|
Internal flashing is possible. OEM BIOS versions 2.87 and 2.90 are confirmed
|
|
compatible with this guide. BIOS 2.05 is confirmed **not** to work.
|
|
|
|
If you have some other BIOS version, please do tell about it on
|
|
[IRC](https://canoeboot.org/contact.html) or comment on this
|
|
[issue](https://codeberg.org/canoeboot/cbwww/issues/73),
|
|
so this guide can be updated.
|
|
|
|
The jumper labelled "FDO" (for Flash Descriptor Override) needs to be shorted.
|
|
That removes all write protections on this board.
|
|
|
|
We can borrow a shunt from another header on the board: PSWD. It is right
|
|
next to the SO-DIMM RAM slots. Move it to the FDO header between the quartz
|
|
crystal (small metal cylinder) and the power cable for the optical drive.
|
|
|
|

|
|
|
|
Boot into an OS of your choice (that has flashprog support).
|
|
|
|
The BIOS should no longer impose any write-protections.
|
|
You can now use `flashprog -p internal` freely.
|
|
|
|
Take a backup of the original BIOS:
|
|
|
|
flashprog -p internal -r oem_bios
|
|
|
|
If you are using the *Canoeboot* ROM images, the ME image is not provided
|
|
and Canoeboot won't provide it. You avoid a brick by flashing *around* the
|
|
existing Intel ME, to avoid a brick. Please read the guide:
|
|
|
|
[How to avoid overwriting Intel ME](../install/ivy_has_common.md)
|
|
|
|
You can now flash canoeboot:
|
|
|
|
flashprog -p internal --ifd -i bios -w canoeboot.rom
|
|
|
|
If migrating from factory firmware (skip if migrating from Libreboot):
|
|
|
|
flashprog -p internal --ifd -i fd -w canoeboot.rom
|
|
|
|
Optionally re-flash the GbE region:
|
|
|
|
flashprog -p internal --ifd -i gbe -w canoeboot.rom
|
|
|
|
You can now move the jumper back to its original place.
|
|
By default, Canoeboot applies no write-protection, so
|
|
updating it can be done without the jumper anyway.
|
|
|
|
### External flashing
|
|
|
|
**Please only flash the BIOS region; if migrating from Libreboot, you must skip
|
|
the IFD region. If migrating from vendor firmware, please also flash the IFD
|
|
region. Optionally change the GbE region. Use the `--ifd` option along with
|
|
e.g. `-i bios` to flash a specific region. DO NOT flash the entire chip, because
|
|
this would overwrite the Intel ME, thus bricking your mainboard.**
|
|
|
|
Unbricking is possible by external flashing. You first need to remove
|
|
the optical disk drive and 2.5" HDD/SSD and the metal bracket that
|
|
supports them. This requires you to open one torx (T15) screw in total.
|
|
|
|
The SOIC-16 flash chip is located on the edge of the board
|
|
near the group of yellow cubes. Follow the
|
|
[general SPI flashing guide](../install/spi.html).
|
|
|
|
|
|
|
|
You might need to power the board by plugging it in. In that case,
|
|
do not connect the Vcc (3v3) pin of the flash chip.
|
|
Also make sure the board doesn't fully power on (that is, boot).
|
|
|
|
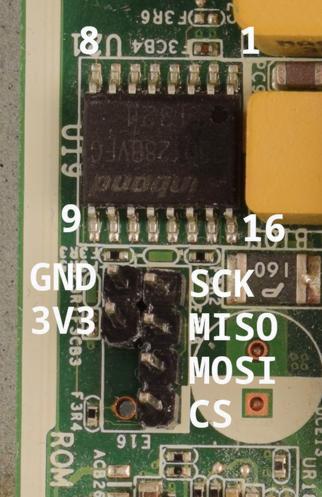
If you don't have a suitable clip, you can also use the ROM_RCVRY header
|
|
right next to the flash chip. By default only the footprint is present,
|
|
so you have to solder a pin header of your own. End result can be seen
|
|
and the pinout can be seen in the photo earlier. Consult the HP service
|
|
manual (page 241) on how to remove the motherboard from the chassis.
|
|
|
|
<http://web.archive.org/web/20210305234331/https://h10032.www1.hp.com/ctg/Manual/c03612798.pdf>
|
|
|
|
If you do this, you have to reapply thermal paste.
|
|
That might be a good idea anyway, considering how old these are getting
|