mirror of
https://codeberg.org/canoeboot/cbwww.git
synced 2024-11-22 10:24:44 +00:00
i overlooked this, when re-writing the guide

Signed-off-by: Leah Rowe <info@minifree.org>
339 lines
14 KiB
Markdown
339 lines
14 KiB
Markdown
---
|
|
title: First-time ThinkPad X200 flashing
|
|
x-toc-enable: true
|
|
...
|
|
|
|
<div class="specs">
|
|
<center>
|
|
<img tabindex=1 alt="ThinkPad X200" class="p" src="https://av.canoeboot.org/x200/disassembly/0019.jpg" /><span class="f"><img src="https://av.canoeboot.org/x200/disassembly/0019.jpg" /></span>
|
|
</center>
|
|
|
|
| ***Specifications*** | |
|
|
|----------------------------|------------------------------------------------|
|
|
| **Manufacturer** | Lenovo |
|
|
| **Name** | ThinkPad X200/X200S/X200 Tablet |
|
|
| **Released** | July/September 2009 |
|
|
| **Chipset** | Intel Cantiga GM45 |
|
|
| **CPU** | Intel Core 2 Duo (Penryn family) |
|
|
| **Graphics** | Intel GMA X4500MHD |
|
|
| **Display** | 1280x800/1440x900 TFT |
|
|
| **Memory** | 1,2,3 or 4GB (Upgradable to 8GB, unofficially) |
|
|
| **Architecture** | x86_64 |
|
|
| **EC** | Proprietary |
|
|
| **Original boot firmware** | LenovoBIOS |
|
|
| **Intel ME/AMD PSP** | Present. Can be completly disabled. |
|
|
| **Flash chip** | SOIC-8/SOIC-16/WSON-8 4MiB/8MiB (Upgradable
|
|
to 16MiB) |
|
|
```
|
|
W+: Works;
|
|
N: Doesn't work;
|
|
U: Untested;
|
|
P+: Partially works;
|
|
```
|
|
|
|
| ***Features*** | |
|
|
|----------------|---------------------------------------|
|
|
| **Internal flashing with original boot firmware** | N |
|
|
| **Display** | W+ |
|
|
| **Audio** | W+ |
|
|
| **RAM Init** | W+ |
|
|
| **External output** | W+ |
|
|
| **Display brightness** | P+ |
|
|
|
|
| ***Payloads supported*** | |
|
|
|---------------------------|-----------|
|
|
| **GRUB** | Works |
|
|
| **SeaBIOS** | Works |
|
|
| **SeaBIOS with GRUB** | Works |
|
|
</div>
|
|
|
|
Dell Latitude E6400
|
|
===================
|
|
|
|
**If you haven't bought an X200 yet: the [Dell Latitude
|
|
E6400](../install/latitude.md) is much easier to flash; no disassembly required,
|
|
it can be flashed entirely in software from Dell BIOS to Canoeboot. It is the
|
|
same hardware generation (GM45), with same CPUs, video processor, etc.**
|
|
|
|
Introduction
|
|
============
|
|
|
|
It is believed that all X200 laptops are compatible. X200S and X200
|
|
Tablet will also work, [depending on the configuration](#x200s).
|
|
|
|
It may be possible to put an X200 motherboard in an X201 chassis, though this
|
|
is currently untested by the Canoeboot project. The same may also apply between
|
|
X200S and X201S; again, this is untested. *It's most likely true.*
|
|
|
|
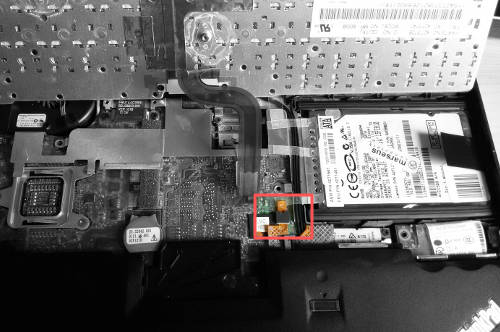
There are two possible flash chip sizes for the X200: 4MiB (32Mbit) or
|
|
8MiB (64Mbit). This can be identified by the type of flash chip below
|
|
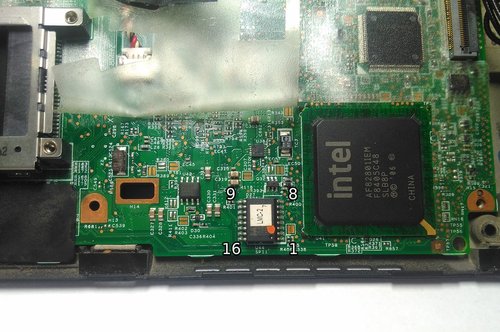
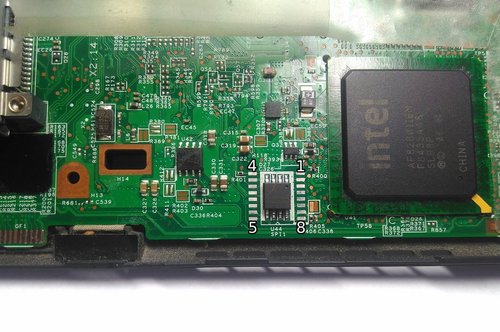
the palmrest: 4MiB is SOIC-8, 8MiB is SOIC-16.
|
|
|
|
*The X200 laptops come with the ME (and sometimes AMT in addition)
|
|
before flashing Canoeboot. Canoeboot disables and removes it by using a
|
|
modified descriptor: see [../install/ich9utils.md](../install/ich9utils.md)*
|
|
(contains notes, plus instructions)
|
|
|
|
Flashing instructions can be found at
|
|
[../install/\#flashprog](../install/#flashprog)
|
|
|
|
NOTE: Canoeboot standardises on [flashprog](https://flashprog.org/wiki/Flashprog)
|
|
now, as of 3 May 2024, which is a fork of flashrom.
|
|
|
|
EC update {#ecupdate}
|
|
=========
|
|
|
|
It is recommended that you update to the latest EC firmware version. The
|
|
[EC firmware](../../faq.md#ec-embedded-controller-firmware) is separate from
|
|
Canoeboot, so we don't actually provide that, but if you still have
|
|
Lenovo BIOS then you can just run the Lenovo BIOS update utility, which
|
|
will update both the BIOS and EC version. See:
|
|
|
|
- [../install/#flashprog](../install/#flashprog)
|
|
- <http://www.thinkwiki.org/wiki/BIOS_update_without_optical_disk>
|
|
- [X200, X200s, X200si BIOS Update](http://pcsupport.lenovo.com/au/en/products/laptops-and-netbooks/thinkpad-x-series-laptops/thinkpad-x200/downloads/ds015007)
|
|
- [X200t BIOS Update](http://pcsupport.lenovo.com/au/en/products/laptops-and-netbooks/thinkpad-x-series-tablet-laptops/thinkpad-x200-tablet/downloads/ds018814)
|
|
|
|
NOTE: this can only be done when you are using Lenovo BIOS. How to
|
|
update the EC firmware while running Canoeboot is unknown. Canoeboot
|
|
only replaces the BIOS firmware, not EC.
|
|
|
|
Updated EC firmware has several advantages e.g. better battery
|
|
handling.
|
|
|
|
Battery Recall {#batteryrecall}
|
|
==============
|
|
|
|
[On 21 April 2015, Lenovo expanded a recall on Lenovo batteries found in some ThinkPad models, which includes the X200 and X200S.](https://pcsupport.lenovo.com/cr/en/solutions/hf004122)
|
|
To find out if you are affected, use [this Lenovo tool.](https://lenovobattery2014.orderz.com/)
|
|
Lenovo advises that owners of the recalled models "should turn off the system, remove the battery,
|
|
and only power your ThinkPad by plugging in the AC adapter and power cord."
|
|
Upon battery verification, Lenovo will replace recalled batteries free of charge.
|
|
Battery replacement instructions for the X200/X200s are found [on this page.](https://pcsupport.lenovo.com/cr/en/parts/pd003507/)
|
|
|
|
LCD compatibility list {#lcd_supported_list}
|
|
----------------------
|
|
|
|
LCD panel list (X200 panels listed there):
|
|
<http://www.thinkwiki.org/wiki/TFT_display>
|
|
|
|
All LCD panels for the X200, X200S and X200 Tablet are known to work.
|
|
|
|
### AFFS/IPS panels {#ips}
|
|
|
|
#### X200
|
|
|
|
Adapted from
|
|
<https://github.com/bibanon/Coreboot-ThinkPads/wiki/ThinkPad-X200>
|
|
|
|
Look at wikipedia for difference between TN and IPS panels. IPS have
|
|
much better colour/contrast than a regular TN, and will typically have
|
|
good viewing angles.
|
|
|
|
These seem to be from the X200 tablet. You need to find one without the
|
|
glass touchscreen protection on it (might be able to remove it, though).
|
|
It also must not have a digitizer on it (again, might be possible to
|
|
just simply remove the digitizer).
|
|
|
|
- BOE-Hydis HV121WX4-120, HV121WX4-110 or HV121WX4-100 - cheap-ish,
|
|
might be hard to find
|
|
|
|
- Samsung LTN121AP02-001 - common to find, cheap
|
|
|
|
*If your X200 has an LED backlit panel in it, then you also need to get
|
|
an inverter and harness cable that is compatible with the CCFL panels.
|
|
To see which panel type you have, see
|
|
[\#led\_howtotell](#led_howtotell). If you need the inverter/cable, here
|
|
are part numbers: 44C9909 for CCFL LVDS cable with bluetooth and camera
|
|
connections, and 42W8009 or 42W8010 for the inverter.*
|
|
|
|
There are glossy and matte versions of these. Matte means anti-glare,
|
|
which is what you want (in this authors opinion).
|
|
|
|
Refer to the HMM (hardware maintenance manual) for how to replace the
|
|
screen.
|
|
|
|
Sources:
|
|
|
|
- [ThinkPad Forums - Matte AFFS Panel on
|
|
X200](http://forum.thinkpads.com/viewtopic.php?f=2&t=84941)
|
|
- [ThinkPad Forums - Parts for X200 AFFS
|
|
Mod](http://forum.thinkpads.com/viewtopic.php?p=660662#p660662)
|
|
- [ThinkWiki.de - X200 Displayumbau](http://thinkwiki.de/X200_Displayumbau)
|
|
|
|
### X200S
|
|
|
|
<http://forum.thinkpads.com/viewtopic.php?p=618928#p618928> explains that the
|
|
X200S screens/assemblies are thinner. You need to replace the whole lid with
|
|
one from a normal X200/X201.
|
|
|
|
How to tell if it has an LED or CCFL? {#led_howtotell}
|
|
-------------------------------------
|
|
|
|
Some X200s have a CCFL backlight and some have an LED backlight, in their LCD
|
|
panel. This also means that the inverters will vary, so you must be careful if
|
|
ever replacing either the panel and/or inverter. (a CCFL inverter is
|
|
high-voltage and will destroy an LED backlit panel).
|
|
|
|
CCFLs contain mercury. An X200 with a CCFL backlight will (unless it has been
|
|
changed to an LED, with the correct inverter. Check with your supplier!) say
|
|
the following: *"This product contains Lithium Ion Battery, Lithium Battery and
|
|
a lamp which contains mercury; dispose according to local, state or federal
|
|
laws"* (one with an LED backlit panel will say something different).
|
|
|
|
Installation notes
|
|
==================
|
|
|
|
[External flashing](spi.md) required, if running Lenovo BIOS.
|
|
|
|
This guide is for those who want libreboot on their ThinkPad X200 while
|
|
they still have the original Lenovo BIOS present. This guide can also be
|
|
followed (adapted) if you brick your X200, to know how to recover.
|
|
|
|
If you have the original Lenovo firmware running, you will need to take the
|
|
keyboard and palmrest off so that you can access the flash chip, which is just
|
|
underneath the palm rest. You will then connect an external SPI programmer, to
|
|
re-flash the chip externally while it is powered off with the battery removed.
|
|
|
|
NOTE: This guide only applies to the regular X200. For X200S and X200 Tablet
|
|
flashing, please read other guides available on libreboot.org.
|
|
|
|
Flash chip size
|
|
===============
|
|
|
|
Run this command on x200 to find out flash chip model and its size:
|
|
|
|
flashprog -p internal
|
|
|
|
MAC address
|
|
===========
|
|
|
|
Refer to [mac\_address.md](mac_address.md).
|
|
|
|
The procedure
|
|
-------------
|
|
|
|
This section is for the X200. This does not apply to the X200S or X200
|
|
Tablet (for those systems, you have to remove the motherboard
|
|
completely, since the flash chip is on the other side of the board).
|
|
|
|
Remove these screws:\
|
|

|
|
|
|
Gently push the keyboard towards the screen, then lift it off, and optionally
|
|
disconnect it from the board:\
|
|

|
|

|
|
|
|
Disconnect the cable of the fingerpring reader, and then pull up the palm rest,
|
|
lifting up the left and right side of it:\
|
|

|
|

|
|
|
|
This shows the location of the flash chip, for both SOIC-8 and SOIC-16:\
|
|

|
|

|
|
|
|
Lift back the tape that covers a part of the flash chip, and then
|
|
connect the clip:\
|
|

|
|
|
|
Now, you should be ready to install libreboot.
|
|
|
|
Refer to the [SPI programming instructions](spi.md).
|
|
|
|
When you're done, put the system back together. If it doesn't boot, try other
|
|
RAM modules because raminit is very unreliable on this platform (in coreboot).
|
|
|
|
Memory
|
|
======
|
|
|
|
In DDR3 machines with Cantiga (GM45/GS45/PM45), northbridge requires sticks
|
|
that will work as PC3-8500 (faster PC3/PC3L sticks can work as PC3-8500).
|
|
Non-matching pairs may not work. Single module (meaning, one of the slots
|
|
will be empty) will currently only work in slot 0.
|
|
|
|
NOTE: according to users reports, non matching pairs (e.g. 1+2 GiB) might
|
|
work in some cases.
|
|
|
|
Make sure that the RAM you buy is the 2Rx8 configuration when buying 4GiB sticks
|
|
(In other words: maximum of 2GiB per rank, 2 ranks per card).
|
|
|
|
In this photo, 8GiB of RAM (2x4GiB) is installed:
|
|
|
|

|
|
|
|
Boot it!
|
|
--------
|
|
|
|
You should see something like this:
|
|
|
|

|
|
|
|
Now [install GNU+Linux](../gnulinux/).
|
|
|
|
X200S and X200 Tablet users: GPIO33 trick will not work.
|
|
--------------------------------------------------------
|
|
|
|
sgsit found out about a pin called GPIO33, which can be grounded to
|
|
disable the flashing protections by the descriptor and stop the ME from
|
|
starting (which itself interferes with flashing attempts). The theory
|
|
was proven correct; however, it is still useless in practise.
|
|
|
|
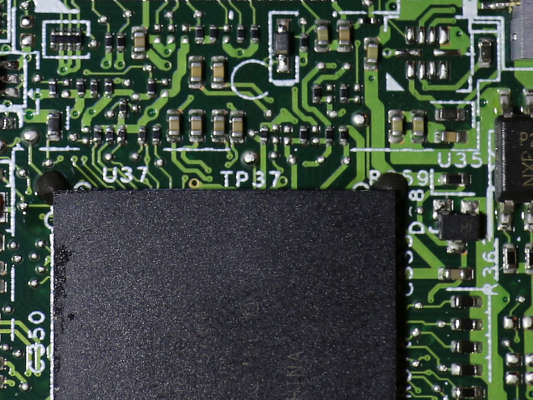
Look just above the 7 in TP37 (that's GPIO33):
|
|
|
|

|
|
|
|
By default we would see this in lenovobios, when trying flashprog -p
|
|
internal -w rom.rom:
|
|
|
|
```
|
|
FREG0: Warning: Flash Descriptor region (0x00000000-0x00000fff) is read-only.
|
|
FREG2: Warning: Management Engine region (0x00001000-0x005f5fff) is locked.
|
|
```
|
|
|
|
With GPIO33 grounded during boot, this disabled the flash protections as
|
|
set by descriptor, and stopped the ME from starting. The output changed
|
|
to:
|
|
|
|
```
|
|
The Flash Descriptor Override Strap-Pin is set. Restrictions implied by
|
|
the Master Section of the flash descriptor are NOT in effect. Please note
|
|
that Protected Range (PR) restrictions still apply.
|
|
```
|
|
|
|
The part in bold is what got us. This was still observed:
|
|
|
|
```
|
|
PR0: Warning: 0x007e0000-0x01ffffff is read-only.
|
|
PR4: Warning: 0x005f8000-0x005fffff is locked.
|
|
```
|
|
|
|
It is actually possible to disable these protections. Lenovobios does,
|
|
when updating the BIOS (proprietary one). One possible way to go about
|
|
this would be to debug the BIOS update utility from Lenovo, to find out
|
|
how it's disabling these protections. Some more research is available
|
|
here:
|
|
<http://www.coreboot.org/Board:lenovo/x200/internal_flashing_research>
|
|
|
|
Of course, it's likely that the Lenovo BIOS is checking for some bit in memory
|
|
that tells it not to disable flashing, and then it won't set PRx registers. The
|
|
way the Lenovo BIOS updater works is, it is executed in Windows first and then
|
|
a reboot happens, triggering the re-flashing to happen during early boot. It is
|
|
probably setting something in memory and loading the ROM, plus a payload program
|
|
that does the flashing; Lenovo BIOS then probably sees that and runs that, instead
|
|
of setting PRx and going for normal boot. It is theoretically possible that we
|
|
could discover how this works, by debugging the Lenovo BIOS update utility (in
|
|
Windows), and then replicate what it is doing, with some tool for Linux,
|
|
then load a flashprog binary into memory and the ROM to flash (for the BIOS
|
|
region). You would do this with GPIO33 grounded, and the payload program would
|
|
actually flash the entire chip, with just a normal libreboot image.
|
|
|
|
It's possible. The above is likely the only way that the Lenovo BIOS updater
|
|
program works. So if we discover precisely how to do that, then you could
|
|
just connect some pogo pins to ground GPIO33, then boot up, run some software
|
|
(which would have to be written) that does the above.
|
|
|
|
On a related note, libreboot has a utility that could help with
|
|
investigating this:
|
|
[ich9utils.md#demefactory](ich9utils.md#demefactory)
|